RStudio Server on a Google Compute Engine instance

When I started my PhD I decided to make my trusty fieldwork laptop – a Google Chromebook – my main work computer and try to do all my research in the cloud. It’s an interesting, ongoing challenge (a blog post for another day), but one thing I realised very early on was that I’d have to do any serious “lab work” (which for me is sitting at my desk playing with computational models) on a remote machine. You can install another Linux distro alongside ChromeOS easily and relatively seamlessly with crouton, giving you a traditional desktop environment to work with locally, but given Chromebooks’ underwhelming hardware, developing even simple models on them is a non-starter.
After a while using a university server, this year I moved all my lab work to Google’s Compute Engine. Like other cloud hosting platforms (Amazon Web Services, Rackspace, etc.) it’s mainly for providing the infrastructure for web applications. But I’ve found them ideal for research too. Relatively inexpensive, you get complete control over a virtual machine, which is securely stored in the cloud, but can also be made, unmade and played with at the click of a button, and if you have a big processing job you can just create a more powerful instance for it (or three). For Chromebook users, Compute Engine instances are easily accessed through a web-based ssh client.
My “Google Lab” became a hundred times more useful when I discovered RStudio Server. I do most of my work in R, so I already knew that RStudio was a near-essential IDE for the language. What came as a wonderful surprise was that there’s a server edition offering a polished, browser-based interface almost identical to the desktop version (for free!) Considering that even big companies’ attempts to bring desktop software to the cloud still deliver either limited functionality “lite” versions or lazy streaming clients (I’m looking at you, Adobe), RStudio really can’t get enough credit for this.
Setting up RStudio Server on a Compute Engine instance is mostly straightforward, but I ran into a few quirks along the way, so hopefully this brief guide will save some people the same head-scratching. I’ll assume you’ve already set up an instance with the operating system of your choice and figured out how to ssh into it. If not, you can follow Google’s quickstart guide (don’t bother installing Apache, unless you want a web server.) But I won’t assume any further familiarity with Compute Engine or Linux servers in general.
My instance is currently based on the stock Debian jessie image, which is what all the commands below will apply to. I’ll try to indicate how to do the same thing on other Linux distributions – but if you opt for Windows, you’re on your own!
Installation
Installing RStudio Server on a Compute Engine instance should be identical to installing it on a real machine. You can follow the instructions for your operating system on the RStudio Server download page, or see below for how to install it on Debian or Ubuntu.
Installing R
RStudio Server’s key dependency is, as you might expect, R itself. First you should configure apt to use the CRAN repositories for your distribution as described here (Debian) or here (Ubuntu), because the default repositories will almost certainly contain an outdated version. First open your Compute Engine’s /etc/sources.list file, using the ssh terminal:
$ sudo nano /etc/sources.list
And add the following line at the end (for Debian jessie):
deb http://cran.rstudio.com/bin/linux/debian jessie-cran3/
Or for Ubuntu vivid:
deb http://cran.rstudio.com/bin/linux/ubuntu vivid/
Then save (Ctrl-O) and exit (Ctrl-X) the file.
Before you use the repository however you’ll need to download its public key (see the “Secure apt” section of the two guides linked above). Debian:
$ sudo apt-key adv --keyserver keys.gnupg.net --recv-key 381BA480
Or Ubuntu:
$ sudo apt-key adv --keyserver keyserver.ubuntu.com --recv-keys E084DAB9
You can then tell apt to update its list of packages from the new repository, and install R’s base package:
$ sudo apt-get update
$ sudo apt-get install r-base
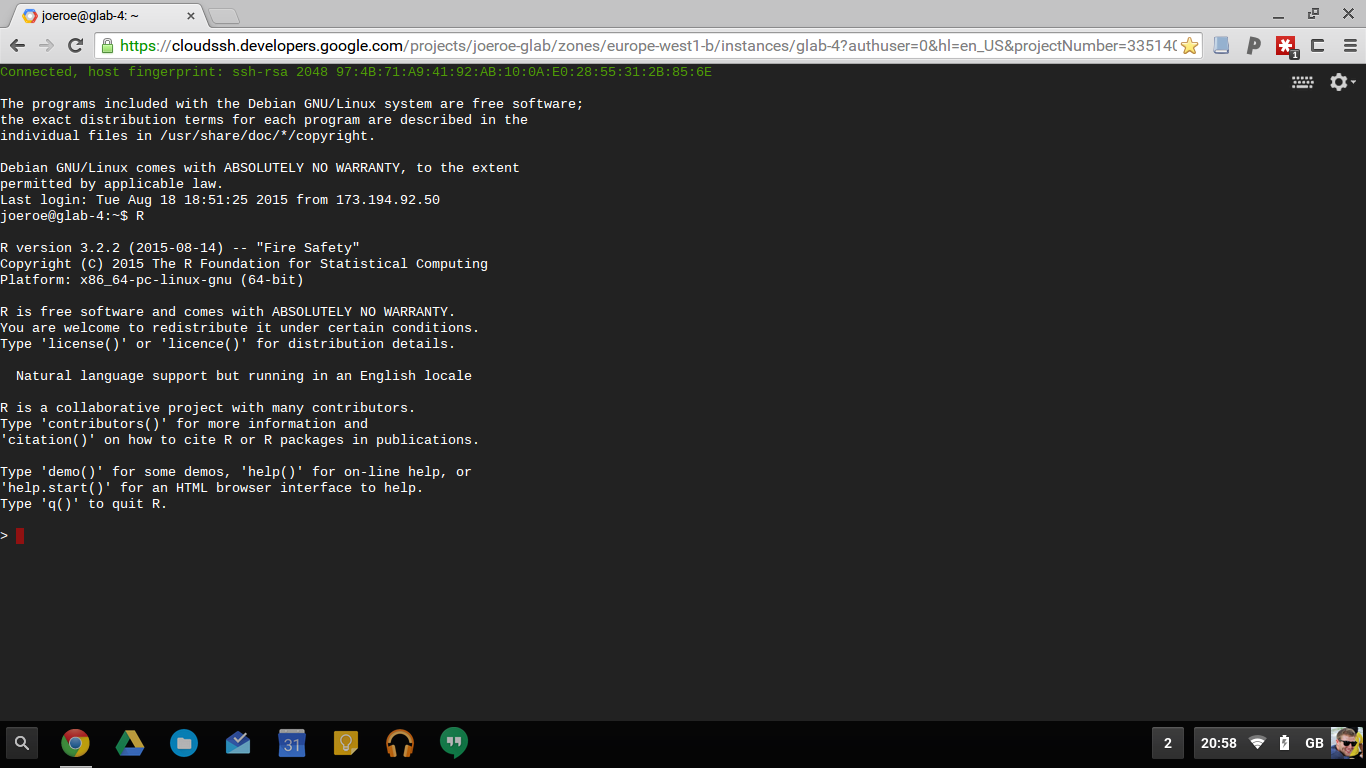
You should now have a working R installation on your Compute Engine instance, which you can access directly from the terminal with:
$ R
But where’s the fun in that?
Installing RStudio Server
Once R itself is installed you’re ready to install RStudio Server. It isn’t included in any repositories, so you have to download it directly from their website and install it yourself. Unfortunately this means it won’t automatically update.
First you’ll need to install the gdebi-core package:
$ sudo apt-get install gdebi-core
You can then download the latest package from the RStudio website and install it with gdebi:
$ wget <latest-rstudio-url>
$ sudo gdebi <latest-rstudio.deb>
Replacing the bracketed details those listed on the RStudio Server download page. Note all Compute Engine instances are 64 bit, so you’ll need the 64 bit package.
Once installed, RStudio Server will start automatically, and will restart every time your instance is booted up.
Accessing RStudio Server
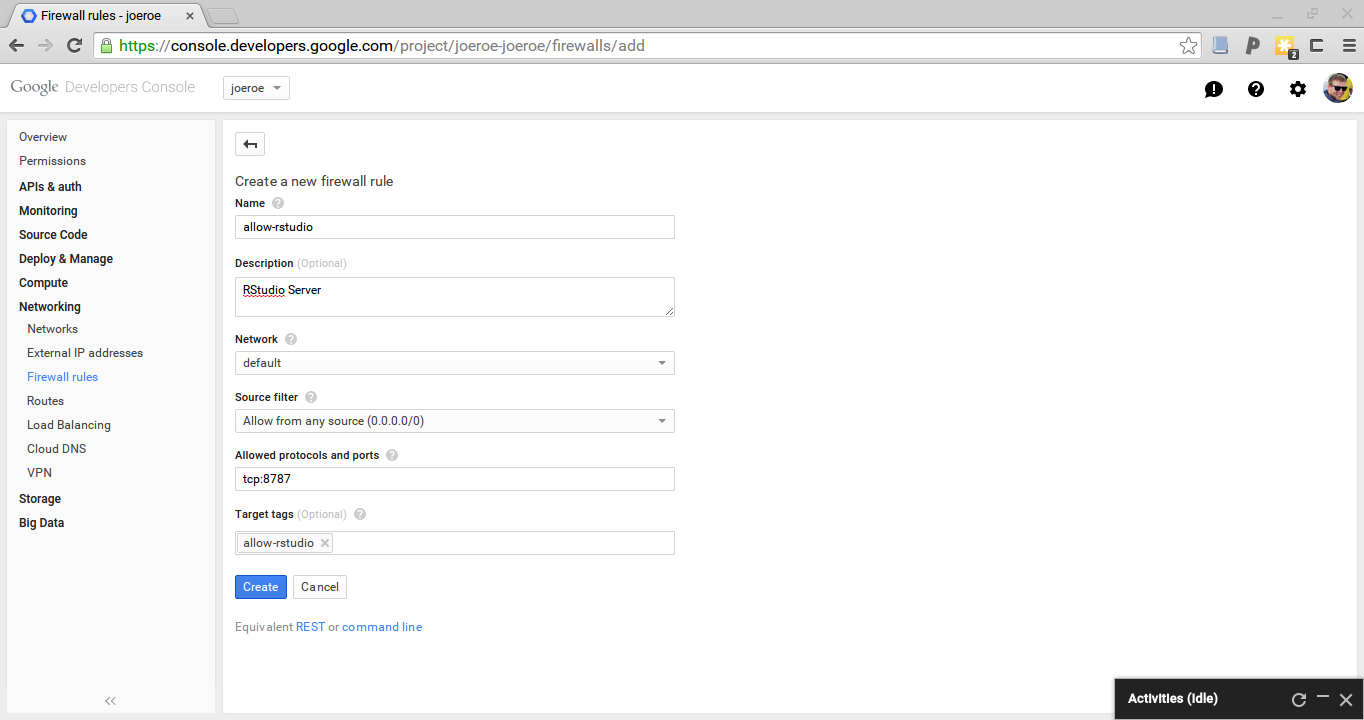
By default RStudio Server is accessed on port 8787, so this needs to be open that up before you can access it. To do this, you’ll need to add a firewall rule to your Compute Engine project, using either the gcloud command line tool or the developers console (under the “Networking” section). Fill in the details as follows:
- Name: allow-rstudio
- Source range: 0.0.0.0/0 (allow from any source)
- Allowed protocols and ports: tcp:8787
- Target tags: allow-rstudio
Note the use of “target tags”; if you want you can just leave this blank and the firewall rule will apply to all your instances by default. But in the interests of safety you can selectively apply it using tags. Just make sure to add the “allow-rstudio” tag to any instance you want to use as an RStudio server.
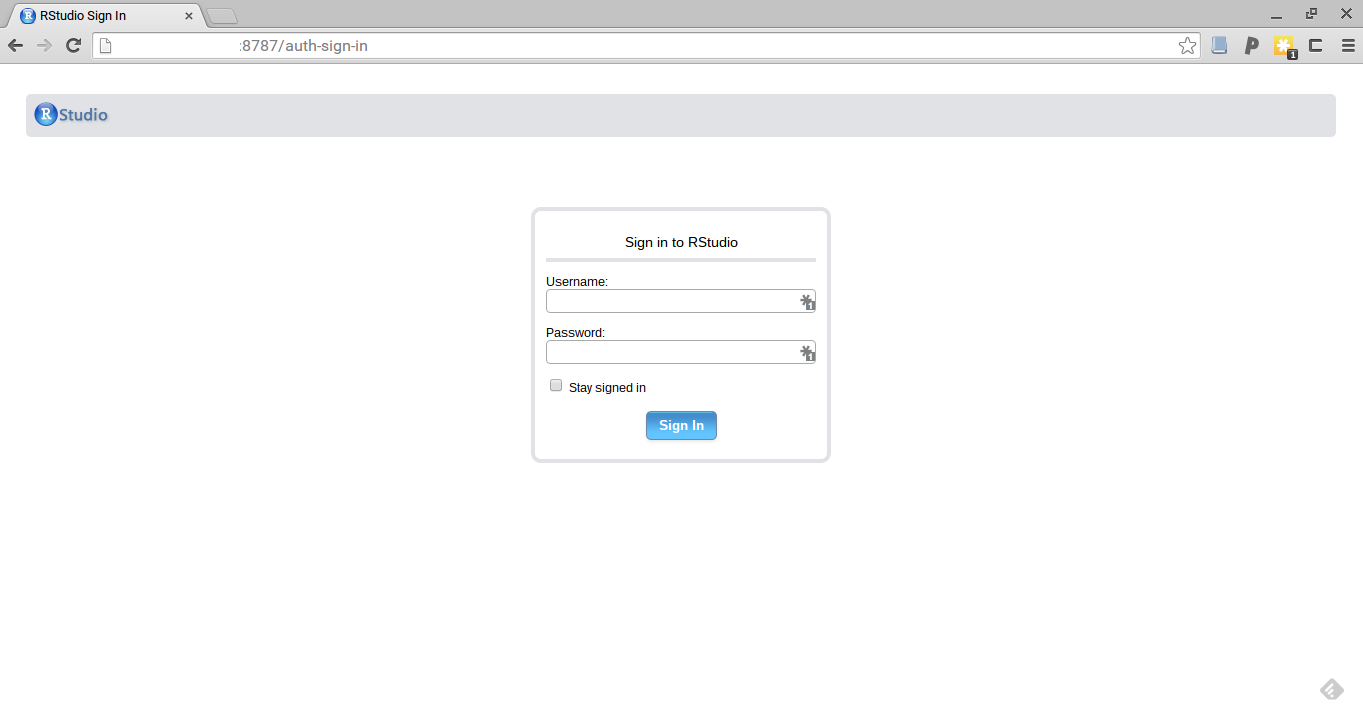
You can now access your RStudio server at http://<your-instance-ip>:8787. If all has gone well, point your browser to that address and you’ll be presented with a login screen (more on that momentarily). By default your instance’s IP is dynamically assigned every time your instance is started – you can find it in the list of instances in the developers console. This can get annoying, though, and it’s worth the small extra cost to attach a static external IP address to your instance in order to access it from a bookmark. Again this can be done using either the developer’s console or gcloud.
Users and permissions
RStudio Server works by logging in to your instance as a normal Unix user. Thus, when you first start it you are presented with a login screen asking for a username and password. This creates a problem because of the slightly unusual way Compute Engine instances handle authentication: you may realise at this point that you don’t actually _know _what your Unix password is. At no point does Google’s browser-based ssh, or the gcloud ssh tool, ask you for one. In fact, the default user created with your instance doesn’t have a password. Both tools exclusively use key-based authentication, and that’s what you have to work with if you want to use standard ssh. Unfortunately this means it’s impossible for RStudio to run as that user, since it doesn’t (yet) support key-based authentication.
The most obvious solution is to create a new user, with traditional password-based authentication, and switch to using that on your instance henceforth:
$ sudo adduser <username>
You can then log into RStudio Server using that username and the password you’re prompted to set. However this is awkward if you’ve already started using your instance for other things as the default user and installed packages, etc. under it. (Obviously none of this applies if you’re operating a multi-user server and have already set up standard users with passwords!)
A neater solution is to give RStudio Server it’s own user (let’s call it rstudio). You can then login to RStudio as rstudio, but otherwise keep using the default instance user for other things (e.g. ssh). This has the advantage of isolating RStudio Server from your main user and its files.
The second option does raise a complication: where do you put your files? If you log into RStudio Server and start using it straight way you are effectively using rstudio user’s home directory as your “R directory.” This will be fine in many cases; you can always use sudo to work with your R files as other users. In other cases however it might be important for RStudio Server to work with files that don’t belong to the rstudio. For example, I keep all my “lab” files, some of which have nothing to with R, under a single folder so I can keep them synced with Google Drive. In this case, you can use Linux’s slightly esoteric but awesome-when-you-get-your-head-around it users, groups and permissions system.
Taking my case of wanting to share the files in my Google Drive with rstudio, you first create a group of users who have access to Google Drive:
$ sudo groupadd gdrive
Next, add both your main user and the rstudio user to this group:
$ sudo gpasswd -a <defaultuser>
$ sudo gpasswd -a rstudio
Then set the directory in question (“g” in this case) _and all its children _to be owned by the default user (which they presumably already are) but also the new gdrive group:
$ sudo chown -R <defaultuser>:gdrive g
And that group members are permitted read, write and execute access to it:
$ sudo chmod -R 770 g
Since rstudio should only be working with the files in that directory, you can change it’s primary group to gdrive, so that all the files it creates are automatically assigned to that group (the default user will have to do this manually, see below):
$ sudo usermod -g gdrive rstudio
Finally, add a symlink to the directory in the rstudio user’s home directory, so it’s immediately visible when you log into RStudio Server (switch to rstudio before running this command):
$ ln -s /home/<defaultuser>/g /home/rstudio/g
You should now have full access to the directory in RStudio Server.
This is the most elegant solution I could come up with after much tinkering with permissions, but there is a catch: the two users (defaultuser and rstudio) both create files in the directory with the system’s default permissions, so they tend to get messed up. Every now and again I need to chown and chmod the whole directory again to get everything straight, which isn’t ideal. So if anyone has any better ideas, please do share!
Using RStudio Server
With a RStudio Server installed and configured you now have an powerful data analysis suite sitting on your virtual machine. If you’ve used the desktop RStudio (or any IDE, really) before you should feel right at home with the interface, which as mentioned is admirably complete and polished. The advantage being it isn’t tied to one physical machine and can be accessed from anywhere – so far my boast for “most exotic location for cloud-based data analysis” is the eastern Jordanian desert (which has surprisingly excellent 3G mobile coverage), where I did some on-the-ground analysis of lithic distributions.